Pages

Tuesday, November 27, 2012

Mid to Late November Hairstyles

Well, it's been another long gap since I last posted in this blog.  I have been rather busy, though.  I might write about that in my random topic blog.  So, without further delay, here are some of my hairstyles from mid to late November:


This first style was started with a ponytail.  I first made a ponytail, then split it in two.  Each half was  loosely braided, then left hanging while I wrapped a silk tube around the base of the ponytail.  My original plan was to pull each braid to the outside, and coil the ends, pinning them in place; but I found that tight braids would have been needed to make it look good.  So, I looped the braids and wrapped the ends around the base of the ponytail instead.  It is somewhat similar to the hair style that Princess Leia wore in Cloud City in the Empire Strikes Back, but her loops were longer, and a portion of her hair made a bun around the base of the ponytail.  I no longer have enough hair to do that.


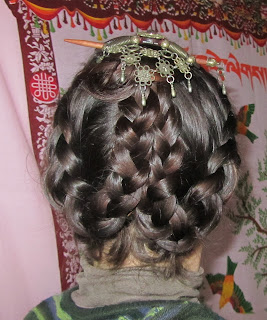
This second style is one of my favorites!  I call it my signature style, because I came up with it on my own (I'm sure others have done the same style before me, but I never saw any images, examples, or descriptions of it, if so).  To do this style I first part my hair in the center, then do a Dutch braid along each side of my head.  After finishing the braids, I pull them up to cover the part on the back of my head, laying them flat against my head and pinning them in place.  The ends are then at the top of my head, where I coil them into a bun.  I like to finish this style with the hair slide I am wearing, but any decoration, or no decorations at all, will work.  I wasn't the most careful in making my bun, but after the photo was taken I fixed the bit that was hanging too low. 


This was simply a Leia's Swirly Bun held with hairsticks from Sticks and Stones.  I have a lot of hairsticks, but haven't used many since my massive shed and resultant major haircut.  My hair is regrowing enough that I think I can start using them again.


This was a quickly done (and obviously slightly messy) Pha Bun.  I am using my 60th Street hair fork to secure the bun.  


This was one of the rare days that I wear a ponytail.  I did a half up with a barrette, then simply ponytailed the rest with a silky and soft large hair tie.


Now, this is an example of what my hair looks like under my bandanna on bandanna days.  I was not feeling well (at all), so here I simply put my hair in a quick Nautilus bun and secured it with medium claw clips.  Straight out of bed; no combing was involved here.  After the photo I covered it with a bandanna.


This was my clownish style for going to get my face x-rays done.  I did a half up with a plastic barrette (which I had to remove for the x-rays), and then did a caterpillar with brightly colored scrunchies on the length.  The next style below was what I did after I got home (taking out the plastic barrette meant I had to redo my hair anyway).


This was my second style for yesterday (the x-ray day).  It was simply a half up and a Nautilus bun held with my 60th Street hair fork.  The medications I am on right now have made my scalp unhappy, so I had to massage oil into my scalp.  That makes my roots look a bit greasy.


The two images above are of today's hairstyle.  A high Pha Bun held with a 60th street hair fork.  The room was just bright enough for the flash to not fire, but dark enough that my hair is dark, grainy, and a bit hard to see.  Sorry about that, I guess it's part of the difficulty of self photographing dark colored hair.  Anyway, I showed it an angle on each side, rather than one photo from the back, because the Pha Bun looks different on each side.

Here are some helpful videos and/or written instructions regarding some of the styles above:


Double Dutch Braids:  

Nautilus Bun:
(Right Hand)
Nautilus Bun:
(Left Hand)

Pha Bun:

:)

Friday, November 16, 2012

Spidermom's Bun

I updated this post on November 27, 2012.  Only because it was done so quickly and was very short previously.

I don't do Spidermom's Bun very often, and I did find it harder to do with nearly waist length hair than I did with mid-thigh to knee length hair.  It is still a nice bun, and held well all day.  I took the picture in the evening, after it got a little messed up (caught on a rough board) while putting a few things in the attic. I used a 60th Street hair fork for this bun.

One thing to mention about buns, is that the length of hair an individual needs to do a specific bun will vary depending upon other factors regarding the individual's hair, particularly the thickness of the hair.  The thicker the hair, the longer it needs to be to do specific buns.  In my case, my hair when this photo was taken, was nearly waist length.  I am regrowing from massive shedding, and my regrowth only reached armpit length at that time.  So, my hair behaves like average thickness at the start of my bun, but behaves like thin hair as I go on in doing a bun (I hope that made at least a little bit of sense).  Most people have tapering in the thickness of their hair with increasing length, because hair is always shedding and regrowing.  My case, of an unusually large shed from health problems, and the resultant demarcation of regrowth, is not the norm.  My unusual situation is very visible in some hairstyles, but well hidden in others (I feel the Pha Bun hides it the best).


Here are instructions I found for Spidermom's Bun:


:)

Thursday, November 15, 2012

A Backlog of Hairstyles

I finally got around to posting my Halloween Hairstyle, and now I am posting the hairstyles that I have worn so far in November.

The first day was a simple Dutch Braid:

Next was a double bun style:

Both of the buns in the above style are "Leia's Swirly Bun" buns.  They are a knot style bun, and can be variable in how they look, depending on what you do with the tail (the ends of your hair that extend from the knot).  I secured the bottom bun with hair pins and the top bun with a Flexi-8.

I did not take a photo every day.  There were a few days that were repeats, and a few days which were lazy, "cover it with a bandanna" days.  Moving on, the next different hairstyle that I did was a basic Chinese bun (the style done with a hair band/elastic):
I used a Ketylo hairstick for this bun.


Next was a slightly messy Dutch ribbon braid bun that I did (with three ribbons).  I secured the outer coil with small claw clips, which adds to the messy look with the ribbon tails:
(sorry about the quality on this one)

Yesterday I did a Japanese bun, with an elastic (starting with a ponytail, basically):
This picture was from the end of the day, so it is getting kind of messy, but that's fine with me.  I used a double ended Quattro hairstick for this bun.

Today I did a Pha bun, but I didn't bother to twist and tuck my ends, so it looks a bit messy:
I used a 60th Street hair fork for this bun.


As usual, I have included examples or tutorials below.  This time all are videos, so if you have a slow connection and/or very old computer, I apologize for so many embedded videos.

Dutch Braid (she does a nice job illustrating the difference between French and Dutch braids at the beginning of her video):

Leia's Swirly Bun:

Ribbon Braiding:

Japanese Bun (I could only find this video, I did not do the diamond variation, just the regular version):


Pha Bun:

:)  

Wednesday, November 14, 2012

Halloween Hairstyle

Sorry this post is so delayed.  I had a house guest coming, and was busy cleaning out and preparing my guest room, so I neglected my blogs.

For Halloween, of course, I had to do a hairstyle that was a little different to go with my costume.  It combined a dutch ribbon braid, a bun made with a ribbon braid, and a hair thing I bought in Japan.  I have a couple of photos below.  To see my complete costume, check this post.


To do this hairstyle, I started with a Dutch ribbon braid on my right temple, and braided around, gathering in new sections until I used about half of my hair.  Then I finished the braid without adding new sections and left it aside.

Next I gathered my remaining hair and made a high ponytail on the left side of my head.  I added two ribbons and ribbon braided the ponytail.  I left it aside, then took the previous braid, brought it around the front and pinned the ends under the start of the Dutch braid.  I left the extra ribbon length sticking out, and looped the longer portion up, and pinned it in place.  I attached the Japanese hair thing with a mini claw clip.

The final part of this hairstyle was to coil the high braid into a bun, and pin it in place with hairpins (this is a little harder to do with the ribbons getting in the way of the hairpins).  I was not careful to be neat with the hairstyle, because it was going to be dark out & I figured no one would notice anyway.


Here is a link for written instructions on how to Dutch braid:
http://www.dreamweaverbraiding.com/braids/dutch.htm

Here is a video tutorial for Dutch braiding:

Here is a video example for ribbon braiding (without a hair band/elastic):